A few years ago, I (mistakenly) purchased the Homelite 24V Cordless lawn mower from Home Depot. I wanted something that was appropriately sized for my small lawn and relatively low maintenance. I wasn’t particularly interested in a gas powered mower just because I didn’t want to deal with the fuel and oil mess.
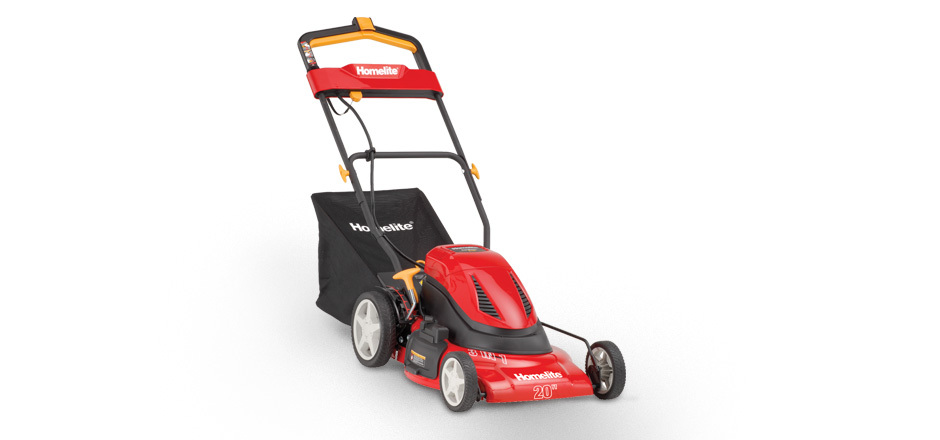 Enter the Homelite. It seemed like a pretty decent mower and it was the smaller of the electric mowers available at The Home Depot. Unfortunately for me, it turned out to be a pretty lame product. In retrospect, I should have read more reviews before buying this one. This mower turned out to be a complete pain in the butt because if it’s battery and charger.
The back story…
I think I had the mower for about 2mo. before I realized that I had made a mistake. I got in the habit of using the mower to cut the front and back lawns then hooking it up the the charger so that it would be ready to go the next time I needed it. When I first purchased the mower, I was pretty excited about having a beautifully trim lawn so I was probably out using it every weekend. As my home projects picked up, I scaled back to about every other weekend. After about two months, of this (maybe 6-8 uses), I started to notice a significant loss of endurance from my battery. I was suddenly finishing my lawn right as the battery pooped out it’s last amp. It seemed like the battery’s was life deteriorating fast.
I talked to my neighbor down the street, he actually had the same mower. Apparently, he was having the same issue but he had the warranty (I got cheap at the register). Looking back at the reviews, it seems that everyone struggled with the crappy battery. After a few more weeks, I noticed it was getting much, much worse. I remember one particular day that I was taking a look at the battery before mowing the lawn and noticed that it was particularly warm. Beyond that, it also appeared to be expanding (a very bad thing for batteries). This battery was toast!
Mower #2…
So, with a dead mower in hand, I did what any dedicated home depot patron would do: I returned the mower, dead battery and all. Then, since I obviously had no common sense, I bought the same lawn mower again! And, like the first one, it worked great, right out of the box. This time however, I had a plan to extend the battery life. This time, after every use, I would just park it in the garage. I’d continue using it until the battery was low. Then, 4 or 6 hrs before the next use, I’d plug into the charger and charge up the battery. This seemed to work pretty well and I got a lot more mileage out of the mower when I payed more attention to the time it was spending on the charger. This lead me to what I believe was the source of the mower problem: the cheap-o-charger.
I think the problem I was having wasn’t really related to the battery but the charger. By leaving it plugged in all the time, I was continually cycling the battery without realizing it. The battery would charge, the charging circuit in the charger would switch off then the internal resistance of the charger and mower would slowly start draining the battery. Once the voltage got low enough, the charger circuit would switch back on and the process would repeat. This would eventually wear down and ruin the battery. By removing the charger between uses, it allowed me to extend the useful life of the battery to a few years.
The Upgrade…
That brings us up to now. Its been a few years (about 2) and my battery is once again, toast. It won’t hold a change and it’ll barely cut grass. This time, I can’t simply take it back to Home Depot. I did find a new (I think it was new) battery online but they wanted ~$80 for it and it was back ordered. I can’t, in good consciousness, go back to another Homelite product so I thought it would be fun to find/ build something better. So, I decided to disassemble my Homelite battery and see what I was working with. Here’s what was inside…

Two 12V lead acid batteries, hooked in series. Luckily for me though, these batteries were nicely packed in a container. All I had to do, is cut the wire leads to the battery enclosure’s connector and I have a handy little box for the new battery module. Plus, from the outside it would look just like the original battery did.
For the new battery, I chose Lithium Polymers (Li-Po). Lipo batteries are light weight, compact and have incredible energy density. To drive the mower’s electric motor, I’ll also need to source a lot of current. Some Lipos can source as much as 50x their capacity so lipos were a clear choice for my new battery.
I spec’ed out and bought two relatively cheap Zippy lipo batteries from Hobby King.

These batteries are 6S (6-Cell) so they have a nominal voltage or about 22.2V, pretty close to the 24V of the original batteries. I opted for the 5000mAh capacity. That should give me a decent run-time but just to be on the safe side, I bought two. If need be, I’ll hook them in parallel for the addition capacity. They are also rated for 20C, which means the maximum continuous current draw is 20x the capacity or 100A. For those who don’t work with electricity, 100 amps is a lot of current and it should be enough to get the mower’s electric motor up to speed and carry it through the high grass.
One thing that I changed on this battery was the connector. I’m not real fond of the bullet style connectors that came installed on these batteries so I switched them out for the XT-60s. I just prefer this style connector.

I also installed the mating connector on the interior of the original battery enclosure. If I choose to use two batteries instead of just one, I’ll either make or buy a “Y” cable to go inside the battery enclosure. That would allow me to hook the batteries in parallel if I needed the extra capacity.

One thing to be aware of while working with lipos (or any other kind of battery for that matter) is that they will always have a charge. If you decide to change out connectors, give extra care to making sure that the wire leads (the positive and negative wires) never touch. This battery can source 100 amps and the last thing you want is your finger to complete the circuit. Just be careful.
Another thing to be aware of is that lipos have a very specific operating range. If drained to low, it could damaged the battery or even cause them to combust. The same can also happen if they are over charged so it’s really important that there is some safeguard to prevent that from happening. After all, I want to trim my lawn, not set it on fire.
Since the lipos will operate in a slightly different range than the original lead acids, the color charge indicator built into the motor handle won’t really help. but it will still provide a voltage indication. I’ll just need to re-mark it. But, what if I’m not paying attention to battery indicator or I forget to watch it? The easiest, low cost solution I could think of was a battery monitor. This little guy provides an easy to read battery voltage as well as a (very loud) alarm should the battery voltage ever get too low (plus it’s real cheap ~$3, so I got 2). It plugs into the batteries balance port so it won’t get in the way if I use it while running the motor.

Since the lipos are obviously very different from the original batteries, I needed a new charger too. I’m using a simple ~200W charger from Amazon although I may get a nicer, higher watt, 4-way charger later.
Results…
I got it all hooked up and tested this setup just last weekend. It worked like a dream!! My lawn was in desperate need of a trim. I think it’s been over a month since my mower crapped out and it took a little while to get all of the components for this build. By the time I got everything together, the grass was plenty long. The longer grass did bog down the motor a bit but I was still able to get my entire lawn mowed on a single 5000mAh battery. The new battery pack is about 1/8 of the size and maybe 1/10th of the weight. All in all, it seems to be far superior to the original battery.
Updates…
Per request, I’ve created a schematic. It’s a crude drawing but it shows how everything connects. It should help if my original post didn’t make sense.
 I’ve also checked the consumption. It was very unscientific but it was easy. I got about 12mins on the first battery before I finished mowing. A separate battery checker gave the capacity as 13%. I’m not sure how the battery checker actually calculates the capacity (or that it actually works) but it must be giving a capacity reading relative to the theoretical minimum operating voltage.
Lipos cannot be fully discharged. The lowest safe operating voltage for a Lipo is around 3V per cell. For this 6 cell battery, that means I can use it until the battery voltage drops to about 18V. So, I suspect that 13% capacity really means that the voltage is sitting around 19V (13% of the operating range of a 6 cell battery). If I assume that the discharge is linear (which it isn’t) then I’m getting about 2 mins of run-time for every volt I discharge through the motor. If that’s approximately true, then I’ll get about 14mins of run-time before the voltage alarm goes off and I’ve reached the 18V minimum.
It would probably make sense to do some additional testing to determine actual run times and current consumption but it’s a lot of extra work. If someone is really interested, I can make some additional measurements with the fluke meter.
One of the other things on my list was to package up batteries a little better. I want the new lipo battery modification to look as original as possible. So, I drew up a model of what a new enclosure would look like.


This part, which is modeled after the original, was designed to be large enough to hold three 5000mAh batteries and is also compatible with the original battery enclosure lid. It’ll take a while to print on the 3D printer but once I’ve got finished and assembled, I’ll add more photos.
-As of October 2016, this modified mower is still running strong AND on the original battery!
I did complete the 3D printed enclosure, I’ll add a pic soon.
I’ve made additions too. Since the new lipo batteries do not operate in exactly the same range as the original SLA batteries, the mower’s built in charge display is incorrect. To prevent over discharging my batteries, I added an external charge monitor. It’s kinda slick so I’ll add this build as a separate post when I get around to it.
Bonus Points…
-Make a video -> Check it out here!
-Add a link for the “dream” charger setup. I actually use the the Hitec x4 but the new Turnigy charger at Hobby King is probably a better deal
– Get a copy of the battery enclosure here.

Thank you so much for the detailed post. This is exactly what I was planning to do, as my original battery has started to give up (after 3 full seasons). It will save me a good load of time for research, calculation and design 🙂
Will let you know how it turns out for me, once done
LikeLike
I’m glad someone has found it helpful. I’d like to hear how it goes. All the best!
LikeLike
If you can post some pics or post a video to youtube i’d like to see your setup.
LikeLike
This is actually on my to-do list, I’ll see if I can post something this weekend. I also realize that some people would rather watch the 5min video then suffer through my writing 🙂
LikeLike
Hi. Great article. By chance do you sell this setup?
LikeLike
I don’t. I’m not sure there’s actually a market for the owners of an old Homelite mower. Everything you need is listed above, the links may be old but equivalent parts are still widely available.
LikeLike
I think the video will help and give those of us trying to do this a visual ref. I am interested in seeing how the batteries are configured and if you are in some way using the old battery housing. I believe you can remove the old 12 volts and fill the void so that it all looks like it came from the factory. Look forward to seeing what you have.
LikeLike
Here’s a link to the video I just posted, it should help fill in the blanks… https://mbhuff.wordpress.com/2016/01/10/homelite-mower-upgrade-to-lithium-polymer-the-movie/
LikeLike
Nice video. I was expecting somewhat of a hack job and boy is that not the case. Professional work from design through execution. Thank you for posting this. Now, if I only had the ability to do CAD and 3D print.
LikeLike
You could upload the CAD model to shapeways or protolabs but it would probably cost twice as much as mower itself. I have a professional 3D printer available to me so it’s not entirely fair to everyone else. However, there is a way to make it work without a 3D printer. You can still use the original battery container, just fill the empty space with something inert. Or, you could chop down the height of the container. This last option would give you just about the same setup that I have minus the flat surface against the underside of the lid.
I’ll be posting another update in a few weeks. I’ve made a few more tweaks to this project that I want to show off. I can explain the 3D printer workaround too. Stay tuned!
LikeLike
Two questions for you … kinda related. I have an Apex Personal Electric Lift used in home healthcare. The power pack has two 12v 4.5 amp batteries daisy-chained together and powers a hydraulic mechanism. The wall charger broke and the replacements run $150 bucks … total rip off. Its a standard charger like you’d find on any small device e.g. an electric rechargeable razor or groomer. I have many extras laying around with various Output and Input ratings. Any idea what may work?
Second question … would the same principle used in the mower work?
LikeLike
1st Answer…
Charging a battery from the wall usually involves converting AC from the wall to DC for the battery. This is the primary function of the wall adapter, it simply converts a known AC voltage to a predetermined DC voltage. To charge a battery, there has to be an additional circuit to drive the voltage and manage the flow of current into the battery. In the case of the mower, the charger or charge controller for the battery was built into the wall adapter so simply swapping it out for another adapter would have been disastrous.
Beyond that, not all wall adapters are created equal. Some use linear power supplies whose output vary with the electrical load. Others use switched-mode power supplies and the voltage output can be different from one to the next. Since I don’t really know anything about your lift, it’s hard for me to say whether or not one or any of your other wall adapters would work. I agree, $150 is way too much for a wall adapter (like more than 10x what it should be).
Before diving into wall adapters on Amazon, You may want to make sure that you’ve properly identified the part that failed. It’s possible that some other part of your lift’s power system has stopped working and it only seems like the wall adapter broken. If you’re sure the adapter is shot, you may also want to figure out why before you throw a new one in the mix (or you may have two broken adapters).
2nd Answer (short)…
Maybe. I don’t know enough about your lift to give you a clear answer.
2nd Answer (long)…
In the case of my mower, I replaced the batteries with smaller lighter batteries of roughly the same voltage. Since these batteries are a different chemistry than the originals, I also had to replace the charger. These changes have made the charging process a lot more involved because instead of just plugging in the mower like I did before, I have to remove the battery and hook it up to a charger on my bench.
If you’re considering new batteries and a new charger for your lift, I think it’s important to understand what the lift is expecting to get from the battery. With the mower, the answer was simple because I was only driving an electric motor (minimal electronics, no computers, screens, or fancy gizmos). 24V and a lot of current was all this mower really needed. Your lift’s batteries may have 4.5Ah capacity but under full load probably source a lot more current than that, you’ll need to know how much. Just for reference, the Homelite mower peaks at about 130A on startup. The 5Ah battery that I used in the mower can source 100A continuous and bursts up to 150A.
Changing battery chemistries also means different voltage swings. If not done carefully, this could damage other components in your lift by supplying either too much or too little voltage. You’ll also need to protect yourself from over discharge. The lifts internal cutoff voltage may be too low for a particular battery chemistry. For a LiPo, that could cause a fire. I don’t mean to discourage you, there’s just a lot that you’ll have to figure out before you’ll know for sure if something like this would work for your lift.
I hope this helps. Good luck!
LikeLike
Thanks for the rundown on the battery charger and potential Homelite like conversion. I’ll get some details to share. The two batteries are heavy as heck and it would be nice to swap them out. I just don’t know if there is any other electronics at work within the housing that I need to account for. Hope to have more info shortly.
LikeLike
This is a great post. I do have one question though. Do you have a link to the charger that you are currently using?
LikeLike
I’m currently using the HiTec 44167 X4 AC Plus 4-Port AC/DC Multi-Charger (http://smile.amazon.com/dp/B005MW0WZO) since I have several batteries to charge at one time. If I were to buy one today, I think it may be the Turnigy Reaktor QuadKore 1200W 80A (http://www.hobbyking.com/hobbyking/store/__82845__Turnigy_Reaktor_QuadKore_1200W_80A_4_X_300W_20A_DC_Synchronous_Balance_Charger_Disc_US_Warehouse_.html). It’s about the same price but much higher wattage which should be handy for charging multiple large batteries.
Keep in mind that both will require an external power supply. Those can get pricey too but there are lot of clever ways around buying a new one. I’ve seen many people use computer power supplies to run their chargers. This is what I use: http://smile.amazon.com/dp/B00AFW6EM6
LikeLike
Thanks for post. I never suspected there were lead acid batteries in there. I left my mower in the garage for a Minnesota winter, and of course the battery is toast. I’ve been excited do conversion before we get too far into the lawn mowing season. However, just now I became aware of the need for both the charger and power source. That is from $117- $200 for the charger and another $100 or so for the power source. Is it possible to get a simple inexpensive charger which has narrower range of use? For example, retrofitting a charger for another type of mower?
LikeLike
There are certainly cheaper options out there. You don’t need a fancy charger like the one I use unless you regularly charge multiple batteries as a time. If you want to keep is simple and inexpensive, there are lots of Lipo chargers with built in power supplies. Here’s a good example of what I’m talking about ($50): http://smile.amazon.com/dp/B010CCMWMO You may also need a charging cable with the same connectors as your battery, not all chargers come with every connector. For my mower conversion, I used XT-60 or XT-90 connectors on the battery and the mower. For XT-60s, this would work: http://smile.amazon.com/dp/B00CD9QN3Y
You may try harvesting a charger from another mower but that could get real tricky if the battery chemistry, cell count, and capacity of your harvested charger don’t match that of your new battery.
Hope this helps.
LikeLiked by 1 person
Hi
I really like your post. This is definitely what I was looking for. The thing is I’m not very familiar with lipo technology. I was looking at this combo for charger and battery.
http://www.aliexpress.com/item/XinShengLi-24V-10Ah-7S5P-29-4v-18650-lithium-Battery-battery-protection-board-Rechargeable-battery-pack/32335814701.html?spm=2114.01010208.3.26.CTut3U&ws_ab_test=searchweb201556_8,searchweb201602_5_10017_10034_10021_507_10022_10032_10020_10009_10008_10018_10019,searchweb201603_1&btsid=e9965897-4509-4729-b496-d1be9ee86940
Is this something I should even consider or go should I go with these:
Charger: http://www.hobbyking.com/hobbyking/store/uh_viewitem.asp?idproduct=92022
Battery: http://www.hobbyking.com/hobbyking/store/__14845__Turnigy_5000mAh_6S_25C_Lipo_Pack_US_Warehouse_.html
I have about a 3000 SqFt lawn and a little concerned about runtime. How long does your setup last before requiring charging?
Thanks for you all your info. Very helpful.
LikeLike
Personally, I think you’re better off with the Hobby King option, which is very similar to what I did. The Turnigy battery that you’ve chosen from Hobby King is rated for a maximum discharge of about 175A. The Aliexpress battery tops out at about 100A. At start-up, this mower will draw about 135A so the Aliexpress battery is a little under powered for this application.
I don’t have a 3000 sqft lawn but if you’re concerned about the run time, there’s nothing wrong with adding a second Turnigy battery in parallel. My lawn is about 800 sqft and I can cut it multiple times on a 5000mAh battery before the battery requires a recharge. With that in mind, the battery will degrade over time so I should see a drop in performance over the years. Thus far, I’m still very satisfied with the battery and modification.
LikeLike
Nice job! I laughed at your story about buying two of these things because I did exactly the same thing. Nice mower, terrible battery. Question, did you think at all about hooking up two 3S’s in series? That looks like it might be a cheaper option. Thanks for the great info!
LikeLike
Thanks for the comment! I did consider using two 3S batteries but ended up going with a single 6S because it would be fewer batteries to charge at the end of the day. Plus, if I wanted to extend the run time, adding an additional 6S would be easier than a 3S. FYI: there are cheaper options for 6S batteries, you’ll just need to shop around a bit. The trick is to find a cheap battery with a relatively high C rating to meet the current requirement of about 135A (peak).
LikeLike
Reference, MPA says:. I looked up hid unit and it appears to be a walwart. he needs to read the specks and find another with the same. Or, he could use 2, 12V walwarts hooked ether in series or to each battery independently. It is ok to pass my address to him if you feel it would be helpful.
LikeLike
The charger isn’t anything special, I’m aware of that. In fact, I really think the charger is the reason my battery didn’t last longer. I did look up a replacement SLA batteries but those weren’t cheap and it wouldn’t have resolved the issue with the charger. This is where I decided to makes something better. I could have bough another wall wart charger and keep with the replacement SLAs but I was not convinced that I’d be any better off with a generic charger than the OEM charger. I suppose if I were interested in keeping the SLA batteries, I would just use the “LiPo” chargers that I mentioned in the blog. These chargers are capable of charging several different battery chemistries, not just lipos. More importantly, they should not drain and recharge the battery if it’s left connected for several weeks. This process is what the OEM charger was likely doing and the reason the OEM batteries eventually failed.
LikeLike
I just picked up a Greenworks 24V mower with a dead battery to do a similar conversion. Unfortunately, my motor has no helpful information on it and I can’t find any documentation on the motor size of the motor in the model 2522. Basically, this means I can’t do a lot of calculation on the battery size I need. All I know is that it’s a 24VDC motor and, after Googling for at least an hour, the other numbers on motor’s nameplate are meaningless.
Using my meter, I know that when the battery is between 25.9V and 25.2V, it uses between 6.1-6.5 Amps. This is a good start, but without a loop meter, I don’t know how many Amps it uses while actually cutting grass. Do you know the idle running current of your motor and/or the running current when you’re actually cutting grass? I’m guessing/hoping yours will be similar to mine.
LikeLike
I’m not familiar with the Greenworks mower but I’ll bet something similar would probably work. If you can’t find the details on the motor, maybe look at the battery specs. If your mower uses a 24V battery with a 20Ah capacity, you could probably get by with a similar battery capacity. Just be sure to check the current ratings.
In my setup, the mower pulled about 135A at start-up. The LiPo battery I’m using can source as much as 175A for a short while (35C). It can also supply 100A of continuous current (20C) so I’m probably well covered for cutting tall grass. The height of the grass will factor in to the amount of current the motor will need to draw. The higher the grass the more current it will consume. If the grass it too tall, it may also bog down the motor a bit. This it’s necessarily bad but it does make your mower less efficient which means you may not be able to run the mower as long as it could if the the grass were shorter.
If you cut your grass on regular intervals then understanding the mower’s runtime for a given capacity is probably a better metric to use than knowing the consumption when the grass it’s actually cutting grass since the latter may fluctuate quite a bit. It’s just a thought. Hope this helps.
LikeLike
Thanks. I found a great sale on 16,000 mAh, 4s Multistar batteries, so I’m running those in series to get 4s. It’s a higher voltage than I wanted, but it doesn’t seem to be too big of a problem so far. If the grass isn’t too long, I can do the whole lawn with about half a charge. I’m actually having a problem with a loose wire somewhere, so sometimes I haven’t been able to finish the lawn the last couple of times.
As for the conversion, it was pretty similar to yours. I’d like to hook up a BMS so the charging and discharging is more fool proof; I don’t want to be the only one that can operate the lawn mower. Since I’ve over-sized the voltage a bit, I’ve also been considering using a voltage regulator. However, considering the price of a regulator that can handle the amperage, I will probably skip that.
LikeLike
I did it Too . Thanks a million .
24V Works .
i put a 22.2v 60000Mah Lipo. Works great .
Look all stock. Plenty of room to fit all.
LikeLiked by 1 person
Glad to hear it’s working!
LikeLike
Correction Sorry . the mower is a WORX 24v. :). My LIPO shows a 50C. I doubt a lot , but it works great . Happy
LikeLike
So what happened to me? Excited or What . 24V 6000 mAh. 🙂
LikeLike
Wow! I picked up one of these mowers off the street for my daughter. I just replaced the original lead acid batteries ($76) and charged them up. Noticed that the charger took them up to over 26 volts before the green light came on. So, I’m guessing that the charger was/is overcharging the 24 volt system, which could also be shortening the battery life.
I have a 3D printer and have used LIPOs for a couple of quad copters i built. I’m inclined to take on your conversion, although i might wait until their battery begins to lose capacity.
Did you finish the design of your new battery case? If so, could you post it on Thingiverse?
LikeLike
I fact mine , WORX 24v, i found it on the street with toasted SLA batteries. I just strapped the LIPO underneath the batterie compartiment with 2 straps. 🙂
LikeLike
I did finish the new battery enclosure, at least to my own satisfaction. You’ll need a good size printer to make the entire part at once but you can download everything here:
http://www.thingiverse.com/thing:1844850
I also uploaded the Solidworks model if you’d like to change anything. Cheers!
LikeLike
Thanks for posting the 3D model. I downloaded and viewed it– looks great. I’ll probably wait until my daughter’s battery fails again. I just installed a couple of lead acid batteries a few days ago and it is now running fine. But, based on everything I’ve heard about this mower, they are likely to begin losing power after a couple years.
LikeLike
Yeah, best thing you can do to prolong your existing SLA would be to only leave it plugged in if it is charging. It may otherwise shorten the life of the battery. Best of luck!
LikeLike
re: don’t leave it plugged in
As well as ensuring that it isn’t left fully discharged. I think too many owners forget about it during the winter months. Apparently it is important to periodically recharge the battery when not being used for an extended period of time.
LikeLike
The problem with the Lead-Gel cells used on the Homelite, is not really the charger, it is the discharge current and depth of discharge. The batteries are 6-DZM-20, which are used in many things including computer UPS(s). While the maximum discharge rate is 200A (for 5 sec), faster discharge-charge rates than 10A result in a shorter life. They are designed to be discharged at about 10A or less with brief excursions into higher current rates. Taller grass results in higher current draw. Deeper discharges also result in a shorter life. Discharge cycles of 100% – will last about 1 year, 50% will last almost 2 years, 30% will last almost 4 years. Temperature also affects life, it is very sensitive below about 10 deg C. — This data is coming from the specs on the battery. Most rotary mowers are powered by a 5 hp gas engine. 150A draw relates to about 4.8hp. The gas engine will source 5hp till it is out of gas – but the electric should only do it for 5 sec max. While the mower will not always be needing 5 hp, it will always need more than 0.32hp (hp related to 10A @ 24V). It is a design flaw in the mower. The battery is not designed for the continuous draw it gets.
LikeLike
Thanks for your input. I agree with your assessment of the batteries, they are certainly not ideal for this mower and these problems are ultimately the result of poor design decisions made by the manufacturer. However, I don’t think the OEM battery was the only culprit here.
On the first battery set, I put the battery on the charger each time after cutting my relatively small lawn. I was certainly not using all of the available capacity of the battery. Charging and discharging in this manner killed the batteries in a little over 2 months. It’s important to note that the charger was left on the battery until the mower’s next use. -I’ll come back to this in a bit.
The second battery set was used quite differently. I would cut the lawn two or three times on a charge (over several weeks) then charge the battery. This time around, I removed the battery from the charger each time it had completed a charge cycle. This method of charging and discharging the battery extended it’s useful life to a few years. I think your explanation may explain the failure of the second battery set but I don’t think it explains why the first battery set failed so quickly.
While I don’t have the OEM charger anymore, I’m fairly certain it was an unregulated, transformer-based charger. These are the absolute cheapest chargers around (which makes a lot of sense for the Homelite brand). They basically consist of a wall mount transformer and a diode. The transformer is designed to deliver 13 to 14 volts over a reasonable current range for a single cell. The biggest problem with this charger is that when the current tapers off, the voltage raises to 15, 16, 17, even 18 volts. At these high voltages electrolysis of the water in the battery starts in. When left connected to the battery, the charger will begin to trickle or float charge the battery. Leaving this for extended periods of time could overcharge or corrode the plates, destroying the battery. It’s also possible that the charger was shutting off when it completed the charging cycle but allowed for a very small current to leak back through the charger or through the mower. This too would also degrade the battery prematurely.
The bottom line is that replacing the battery and using a proper charger has vastly extended the useful life of this mower. If I were so inclined, I could buy an OEM charger for additional testing and tear-down but as far as I’m concerned, the problem with the mower has was resolved when I switched to a Lithium Polymer battery and an intelligent charger. I’m going to leave the real work for Homelite to solve. They created this mess, their engineers can solve it for themselves.
Thanks for weighing in! I do appreciate your perspective on the batteries. I think a good number of people have found the original post and comments like yours helpful.
LikeLike
NOTE: Life estimate also includes storage discharge as a cycle. Mine are pessimistic, but seem more like what is being seen on the mower. I also suspect that the charger is not designed to handle sulfation prevention of the battery (requires brief jumps to 18v per battery – 36v total). Charging to 26v is ok for full charge. Full charge is about 13.7v per battery, or 27.4v for the pair.
LikeLike
Final NOTE: Some 6-DZM-20 batteries are AGM(absorptive glass mat), others are Gel. Watch out for the Gel, they don’t tolerate short high amp discharges very well.
LikeLike
The original ZIPPY Flightmax 5000mAh 6S1P 20C batteries you used are no longer in stock. I find at Amazon the
HobbyKing ZIPPY Flightmax 5000mAh 6S1P 30C / Capacity: 5000mAh / Voltage: 6S1P / 6 Cell / 22.2v / Discharge: 30C Constant / 40C Burst / Weight: 730g. What effect would the 30C cause? Higher amps thus lower run time? Or would the mower just not pull more than 100 amps?
LikeLike
The current consumption and run-time will be determined by the load (the motor) and in this case. How tall is your grass, how many time you start and stop, what the battery capacity is. If you have the same mower, you’ll need to support a burst current of about 135A. You don’t have to use the exact batteries that I used but it should be at least capable for a 150A burst to be on the safe side. A burst rating of 100A may degrade the battery prematurely. You should be in good shape with the battery you’ve chosen.
The C rating is the current rating for the battery and as you mention, there are several current ratings for a battery. 30C Constant is the continuous current rating. 30C really means 30*(the capacity) = 5A*30 = 150A. The 40C is the Burst rating, this is the maximum current that the battery can source. Some battery manufacturers inflate this number to make their batteries more competitive so take this into consideration. At 40C, this battery can supply a burst current up to 200A for a short time (like when starting a motor). Charging current is usually no more than 1C unless stated otherwise. In this case, you have a 5A battery so you can charge at a maximum of 5A if your charger will allow. You can certainly charge at a lower current but it will take more time to complete.
Thanks for reading! Hope this helps!
LikeLike
Hi . I built a 6S4P Battery pack with used 18650 samsung cells . i have a 24V and around 8000mAh.. Don’t know much about how much C these cells have. Therefor i don’t puch it a lot when used on the mower . It work great. i try to not have a lot of starts stops . Question please Can use in in parralel with a LIPO pack ? My thinking that the Lipo will provide the High C and burts but i will have much more amps under the hood
LikeLike
hi!,I love your writing so a lot! percentage we keep up a correspondence extra approximately your post on AOL? I require an expert on this space to resolve my problem. Maybe that’s you! Taking a look ahead to peer you.
LikeLike
how Iconvert my homelite lawn mower to electric,I have very small yard and I d’ont care use a electriccord
Thank you
Albert
LikeLike
Why can’t you use the original charger and connectors for this lipo conversion?
Ken
LikeLiked by 1 person
The original charger isn’t designed for the lipo battery chemistry so it won’t charge to the right voltage levels. Doing so would likely damage the battery. For this reason and other reasons, it’s necessary to use a lipo charger.
As far as connectors go, you could use whatever you want. The XT60s/XT90s are fairly common among lipo batteries so I stuck with those. The battery still attaches to the mower using the same OEM connector. Now, instead of the other end being hardwired to a pair of lead-acids, it attaches an XT60/XT90 connector that mates with the matching connector on the lipo.
Hope this helps,
Mike
LikeLike
Hi MB Huff! Would you be willing to sell me one of your 3d printed cases?
LikeLike
It’s available on Thingiverse. If you click the link above, you should be able to view and download the files directly or order it from one of thingiverse’s partners. I can also post it to shapeways if you like. Fair warning though: I have not done a fit-check with the latest iteration.
LikeLike
It should be up here shortly… https://www.shapeways.com/shops/shophuff
I don’t mark-up my parts so this is shapeways’ regular pricing.
LikeLike
Wonderful design and engineering. I’m in the same boat – bought the mower, and battery is completely dead after 1+ years. I’m in Vermont, and bought it in Vermont, but no one mentioned cold as a factor. Didn’t know I had to bring my mower inside for the winter!! I believe the link you have for the charger is out of date and no longer available. What are the specs to look for, or do you have a recommendation. Same for the LIPO batteries. MANY THANKS!!!
LikeLike
Look for 6S (6-Cell) Lipo batteries. They have a nominal voltage or about 22.2V, pretty close to the 24V of the original batteries. I opted for the 5000mAh capacity but you could go higher if you have a rather large lawn. A bust current rating of 25C (or higher) should be enough for the mower as it draws about 135A at startup.
LikeLike
I have a 550e rc helicopter that uses a 5000mah. i saw the lawnmower for free on craigslist. that is what lead me to your article I have that ryobi riding mower that is fast. i can use the battery in the heli and mower. i use a xt90 connector. thanks for info
LikeLike
So , What would you say is the round about cost of all of these upgrades you made? I have a charger that got drowned and I’m looking at spending $60+ just to replace the charger, and I can still look forward to battery problems, so is it worth it to do the effort and upgrade the battery and all like you did ? will it cost around $70 and give me better output and range than the regular battery, which was only charging up to 75% anyway?
LikeLike
You’re looking at about $60 for a decent 6S charger, $80/battery (6S, 5Ah), and about $10 for connectors (recommend XT-90). It’s also not a bad idea to have a charge monitor, you can get them for a few bucks ($5 for two) on ebay, amazon, or hobby king.
If you have a relatively large lawn, you may need additional batteries. I have a pretty small lawn so I can easily get by on a single battery. As the batteries age, you’ll loose some capacity so it makes sense add batteries in parallel to increase overall capacity.
The biggest advantage of this modification are:
-Toss the OEM charger, this was cooking my OEM batteries.
-Lipos are higher energy density, smaller and lighter for same capacity.
-With the space provided for the OEM batteries, this means you can have a greater overall capacity than the original mower or for the same capacity the mower would weight less (easier to push).
-These types of batteries are very common and are available in a variety of sizes which makes them very easy to replace. (extends life of mower)
– These batteries are not specific to the mower. With XT-90 connectors, these can be used for other home projects too.
Disadvantages:
-Requires Lipo capable charger
-Batteries should be balanced to prolong lifetime
-Charge operation is not as simple as original
-Lipo batteries can be dangerous, use caution when installing new connectors and be mindful of storage requirements.
Hope this helps!
LikeLike
I just bought a Weedeater brand 24V cordless mower with the 24V lead-acid battery after reading this blog. The charger definitely overcharges the battery but that is easily solved by adding one or two diodes in series with the charger output. The charger is rated for a 2 Amp output, so the diodes need to be rated for at least 3 Amps. You want as many diodes as it takes to lower the voltage at the battery to 27.0-27.5 Volts when the indicator on the charger turns green. There is a band on each diode, so just make sure that you have the band on each diode pointed in the same direction. If the battery is in need of charging (yellow indicator on battery, or lower than normal mowing speed or the battery is lower than 25.4 Volts when not charging) but the charger does not indicate charging or battery voltage does not immediately increase when connected to the charger, the diodes are installed backwards. If my battery ever fails, I intend to convert to Lithium for the weight reduction, but I fully expect 5-7 years on the lead acid battery as it did on my last 2 Black & Decker 24V mowers (18 years of service between the 2 on a 1/3 acre St. Augustine lawn). Interestingly, the B&D charger never had an overcharging issue.
LikeLike
Using diodes is not a bad idea but by the time I had realized what was happening, the batteries were already shot. So, I had a choice to buy replacement OEM batteries or upgrade to lithium.
I’m not sure that dropping the voltage by x(Vf) is going to stop the root issue (as I see it). I think I explained this above but real quick recap of my thoughts:
I think what’s going on is that the battery is dischaging while it’s installed in the mower. Vbatt hits the Vthres for the charger and the charger kicks on. If this happens several times a month, that’s adding cycles to the battery and slowly degrading its performance and reducing the useful life of the battery. I’m not sure that reducing the chargers effective voltage would keep this from happening. Not to mention, this mwill also reduce the rate of charge too.
If I’m perfectly honest with myself (and the internet), the MOST effective and efficient method of eliminating this problem would be to charge the battery for only as long as needed and then remove the battery from the mower and charger. If your mower is new, this would be my BEST recommendation.
I do appreciate your thoughts and feedback. I hadn’t thought of using diodes on the charger output but I’m glad to hear about all of the interesting solutions that you and other readers have come up with. Thanks for weighing in! I’m pretty much committed to my own course of action but that said, someone else might give it a shot. I really like how you and others are chiming in and contributing to the conversation. It’s cool! And, it makes the topic feel more relavent.
Cheers!
LikeLike
I just wanted to take a minute to say thank you for your post on the homelite lawn mower. I was driving down my street this morning and saw a mower parked on the curb for the trash so I brought it home and you check it out and I soon I am going to have to put new batteries in it but aside from that looks to be in great working condition. Anyhow post for a newer Model appears to have all of the info that I want you to place upgrade batteries on this one. It’s nice to see other people taking the time to detail of their little side projects and allow others the benefit of their knowledge and experience.
LikeLike
I’m glad you enjoyed the write-up. Thanks for the kind words.
LikeLike
Thank you for all the helpful info! I read that I needed to charge the battery for 15 hours for full charge, so I was setting alarms. I have been removing my battery over the winter which has helped tremendously with extending its life. I am going to have to order a new charger however, since I NEED to mow NOW and I can’t keep borrowing my neighbor’s. However, I am intrigued by this conversion.
I was wondering what the overall cost of this whole project was. I’m sure overall it’s worth it, but right now $30 is agreeable with wallet.
LikeLike
Generally speaking, this mod will probably run from $100 to $200 based on what components you buy or have laying around. Things like chargers, batteries, and connectors can be used for other things too so few parts are dedicated to the mower.
Hope this helps!
LikeLike
Wow! Nice job. Is it still working? My original battery, and a replacement battery both crapped out, and now I can’t find a replacement battery anywhere. Homelite customer service keeps dropping my calls! What waste of time and money.
LikeLike
Love this post! Thank you for sharing this information, as I plan to make this modification to my Homelite mower next week. I concur that the charger from the manufacturer is likely the primary reason for premature battery failure. I have had this mower for about six years, and only had to replace the battery twice now. Both times appear to be related to leaving the charger in for way too long. Just to add a thought about the modification for those that do not have a 3D printer, it would seem logical to simply cut a hole in the bottom of the original housing.
LikeLike
I purchased this lawn mower several years ago, and meticulously charged the battery every 30 days as suggested, and kept the battery indoors. But it still only lasted about 4 years. I have not used the lawn mower since – due to the $140 expense of 2 new gel cells that would likely only last another 4 years. This is the manual of the 20 inch – I think mine may be 17 inch. https://www.kotulas.com/wcsstore/KotulaStorefrontAssetStore/images/pdf/34068.pdf I am back to using my corded electric mower – which is over 30 years old and still works fantastic – but the cords for cutting two 1/2 acre yards is a pain. Lots of plugging and unplugging to different plugs and lifting the cord. I am considering purchasing a Li Ion rechargeable lawn mower – but since the rest of my lawn mower is in such great shape, I would love to be able to convert mine to Lithium ion or the LiPo that you suggest. I would want at least a 30 minute run time But I am a bit challenged with knowing where to begin. And is there a way to do this where the discharge time is a bit less finicky? Any advice you can give me to get me started would be appreciated. My dad used to be very helpful with electrical stuff (he wired a few houses) but he is not in the best condition anymore. But he might be able to help me better understand any advice you can provide.
LikeLike
Honestly, for two half-acre lawns, I’d stay away from battery operated mowers. In your case, the big reason to avoid cordless mowers is that you’ll likely need several batteries (or charges) to finish the job. For the cost and level of effort, I think you want to look at gas powered mowers.
Batteries will loose capacity as they age. You can account for some of that by over sizing the capacity for your mower (adding more batteries) but the trouble is that batteries are not particularly cheap (albeit less than a mower). If you have buy four batteries, you might be better off spending a few extra dollars for the gas mower that will run until you stop fueling it.
If you like the idea of gas but would like to keep costs down, you may check out rental places looking to sell used or slightly damaged push mowers. Home Depot would be a good place to check. Fixing a broken wheel on a gas mower that was on Home Depot’s damaged rack might be easier that refurbishing an electric for the same price.
Since you asked though, it’s not particularly easy to calculate how much capacity you’ll need for your lawn as there are many factors that’ll weigh into how long it will need to run. For example, you may want to account for grass height, cutting speed, no. of start/stops, % overlap on each track, multiple passes, etc.
A little back of the envelope math here:
1 acre of yard -> ~5.5mi of mowing an 18″ width. Ignoring all the mower stuff, a steady pace of 3mi/hr, mowing your lawn may take about an 1hr 50mins. If a 5Ah battery runs an no-load mower for 30mins (assumption), you’ll need at least 4 batteries. Now if we factor in all that other stuff maybe we need an extra 20% capacity so one more battery. These batteries can run about $100 each so you might be looking at $500 which is a good starting price for a gas mower.
Hope this helps!
LikeLike
Thanks. Even though the lots are large – which is why the cords are a pain — they are not completely covered in grass (lots of garden and gravel areas). So I easily cut my lot with one charge of the rechargeable model. So it was perfect – except for the short battery life. I now cut my parents lawn next door too – but I don’t usually do them on the same day. So about 45 mins of run time would suit me very well. But if the batteries are about $100 each, plus I would need a new charger. Would purchasing a new Li Ion lawnmower at Canadian Tire for $500 be the way to go? I also thought I one time found a video from someone who converted a lawnmower to use a regular car battery – which although heavy (would give me more of a workout) they are cheaper to replace and I already have a charger for a car battery.
LikeLike
Don’t laugh I’m a 75 year old woman with this mower that I’m trying to use to stay on budget could I buy the batteries and attach them putting them in the original box and if I can find that monitor do you think I could do this and just have the batteries just lying in the box
LikeLike
Ok, if you just want to get it up and running again, I think the simplest (easiest and cheapest) approach is to replace the battery with an equivalent SLA. You can find suitable replacement batteries on Amazon here: https://smile.amazon.com/dp/B01ICQRBA0/
There are two SLA batteries in the mower originally (as described above). I think all you need is a screw driver a you’re good to go.Watch my video if you want to see it first (link at the bottom of the article). Be mindful of the springs for the battery latch, they’ll pop out if you’re not careful.
This solution doesn’t fix the real problem with this mower (which is the battery charger). For that reason, I’d recommend you also get an outlet timer so you can set it to charge it for 2-6hrs then let the timer disconnect the charger. That may prolong your battery life without having to be religious about removing the charger. something like this should work perfectly: https://smile.amazon.com/dp/B004LXK8PO/
Hope this helps! Good Luck!
LikeLike
Thank you so much for the detailed post. What happen if I use a 7S1P / 7 Cell / 25.9 V 5000 mah, I think in this case battery will work in range of 21-26 volts which is near to 2 X 12 v acid battery, and perhaps the main battery indicator will be more useful in operation. And maybe the motor work longer time in more rpm speed cause of more voltage.
LikeLike
A 7S battery may work just fine but I’ve not tried it. Keep in mind that a 7S lipo will top out around 29.4V when fully charged. The original SLA will be a bit lower than that but may work just as well. I don’t think there’s much risk to damaging the motor but there’s a slight possibility that it could break the battery indicator LEDs (but I doubt it). Let us know how it works out, I’m curious.
I think I started with the 6S because I had one on hand but that was a while back.
LikeLike
I used a small digital voltage indicator inserted into the LED plastic box to show charge level. The indication is only on when the mower is operating. Also used the old charger battery side cable. Cut off the charger and added an XT60 to the cable and connect that to a turnigy accucell C160 to charge the batteries. One 5000mAh LiPo was indequate for my purposes, so added a no wires parallel connector and a second 5000mAf LiPO.
LikeLike
Nice! Just be careful not to over discharge those lipos! I didn’t want to reuse the built-in charger cables because there weren’t enough conductors to do balancing (which I do every time). Also, since I use my batteries for other things, I pull them out after each use anyway.
One nifty little gadget that I didn’t get around to posting about was a little voltage monitor/ alarm unit that I made for this. What I discovered was that the mower’s charger port is compatible with an old RCA connector. I purchased a 6S voltage monitor alarm, attached an old RCA connector, and installed it on the charge port. This allowed the monitor to sit outside the battery housing with no rework to the mower. I didn’t end up using it much since the cheap monitor I listed above has an alarm built in that I could here just fine. Other issues were that the 6S voltage monitors were not very good quality (and tend to fail often) and the RCA connector didn’t stay well attached while rolling over bumps.
LikeLike