As a designer, I’ve always been interested in things that are unique and aesthetically pleasing but also functional. Cycling is combination of all these passions since it culminates in a mechanical system that not only serves a purpose but one that can do so in a unique way and with style.
In my mind these past few years, I’ve been accumulating, cataloging, and organizing ideas, products, and vendors that I could use to build my ultimate cool bike. What I put together in the end was a really awesome bike that turns heads and gets many other cyclists asking questions. I’m proud to share the my experience and build components with you (and the internet) so that others can build similar bikes or learn about what worked and what didn’t.
Design Concept
Up to this point, I was mostly familiar with road biking (which I did a fair amount of) and mountain biking (which I used to do a fair amount of) but I wanted to try something new.
- Single-speed cycling was something that I was interested in. Many cyclists use it to practice spinning, increasing their cadence, and enjoy the simplicity of riding with only one gear. Single speeds are not necessarily built for speed but since they only have one gear, it’s easier to get into a rhythm where you carry a little extra speed that you might otherwise not do on road bike.
- Not a fixed-gear or fixie bike. Its just too trendy at the moment and I prefer brakes.
- Different and Unique. As with everything I do, I wanted to try something a little different and new. With cycling, lightweight is always desirable and with the affordability of carbon, why not. Carbon isn’t unique but a carbon belt drive is. I thought this would be a great opportunity to try it out.
- Strong and Durable. I’m not a pro so this bike will likely be used for commuting and trips around town. What I’ve learning in my many years of cycling is that commuting takes it’s toll on bikes. For that reason, the bike needs to be pretty sturdy or could at least handle rough terrain.
- Geared for everyday. I figured that I would probably ride this bike daily so I wanted something comfortable. But, it had to have the right balance between speed and leisure. For my commute, I’ll need to have gearing suitable for an easy 2mi climb.
Frame: Carbon
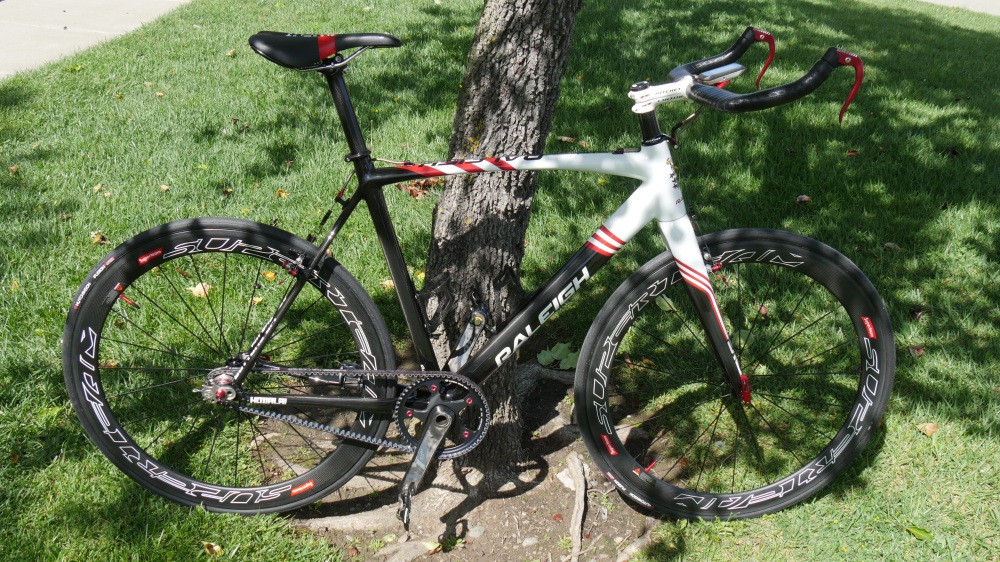
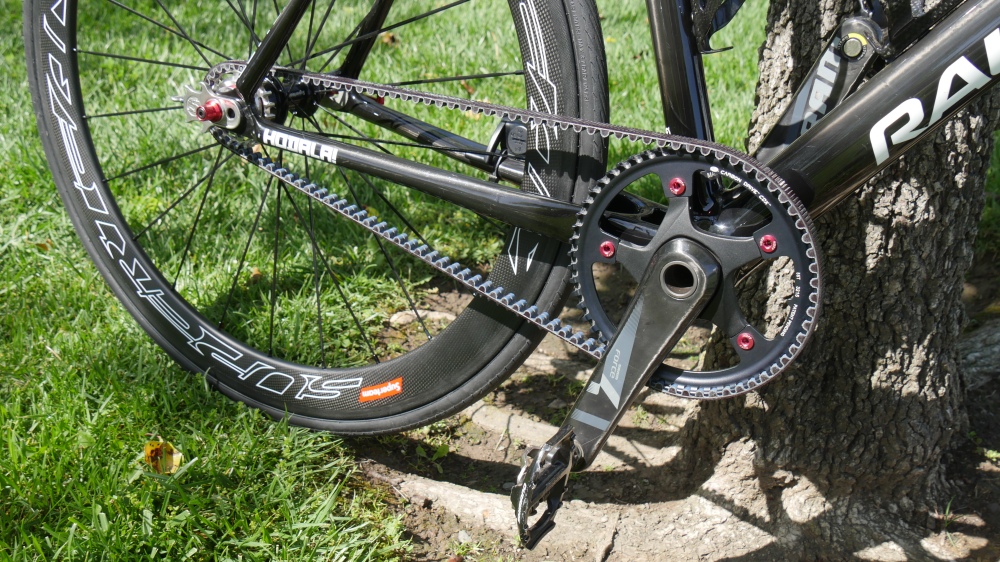
First and foremost, let’s talk frames. For this build I chose the 2013 Raleigh Hodala SSCX carbon frame. This sweet ride was only available as a frame, Raleigh didn’t sell a complete Hodala bike. That makes is a bit unique but there are a few things about this frame that actually make it pretty special.
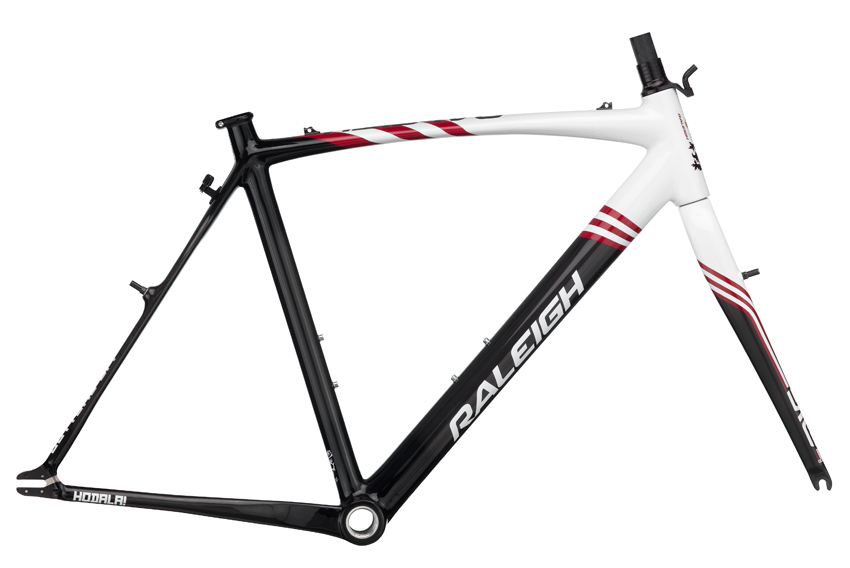
For one, this is a carbon single speed cyclocross (SSCX) frame. For those of you who are unfamiliar, cyclocross (or cross) frames are much like road frames except that they have wider tire clearances to accept knobbier, off-road tires. There are a bunch of other minor differences to cross frames but the tire clearance is possibly the easiest to spot. For this build, the single speed (track fork-end) and cross frame hit some of my design goals. I decided to stick to a single gear (rather than a geared hub) to keep the bike lightweight and maintain a clean look. It also gives me the option to ride trails or mud.


Another really cool bit about this frame is that it can run a carbon belt. If you’ve never heard of carbon belt drive bikes, you’re not alone. I’ve got more on this later but the unique attribute here isn’t just a carbon frame or just a belt drive, its the combination of the two. This combination make the Hodala SSCX frame a truly light build, even with alloy components.
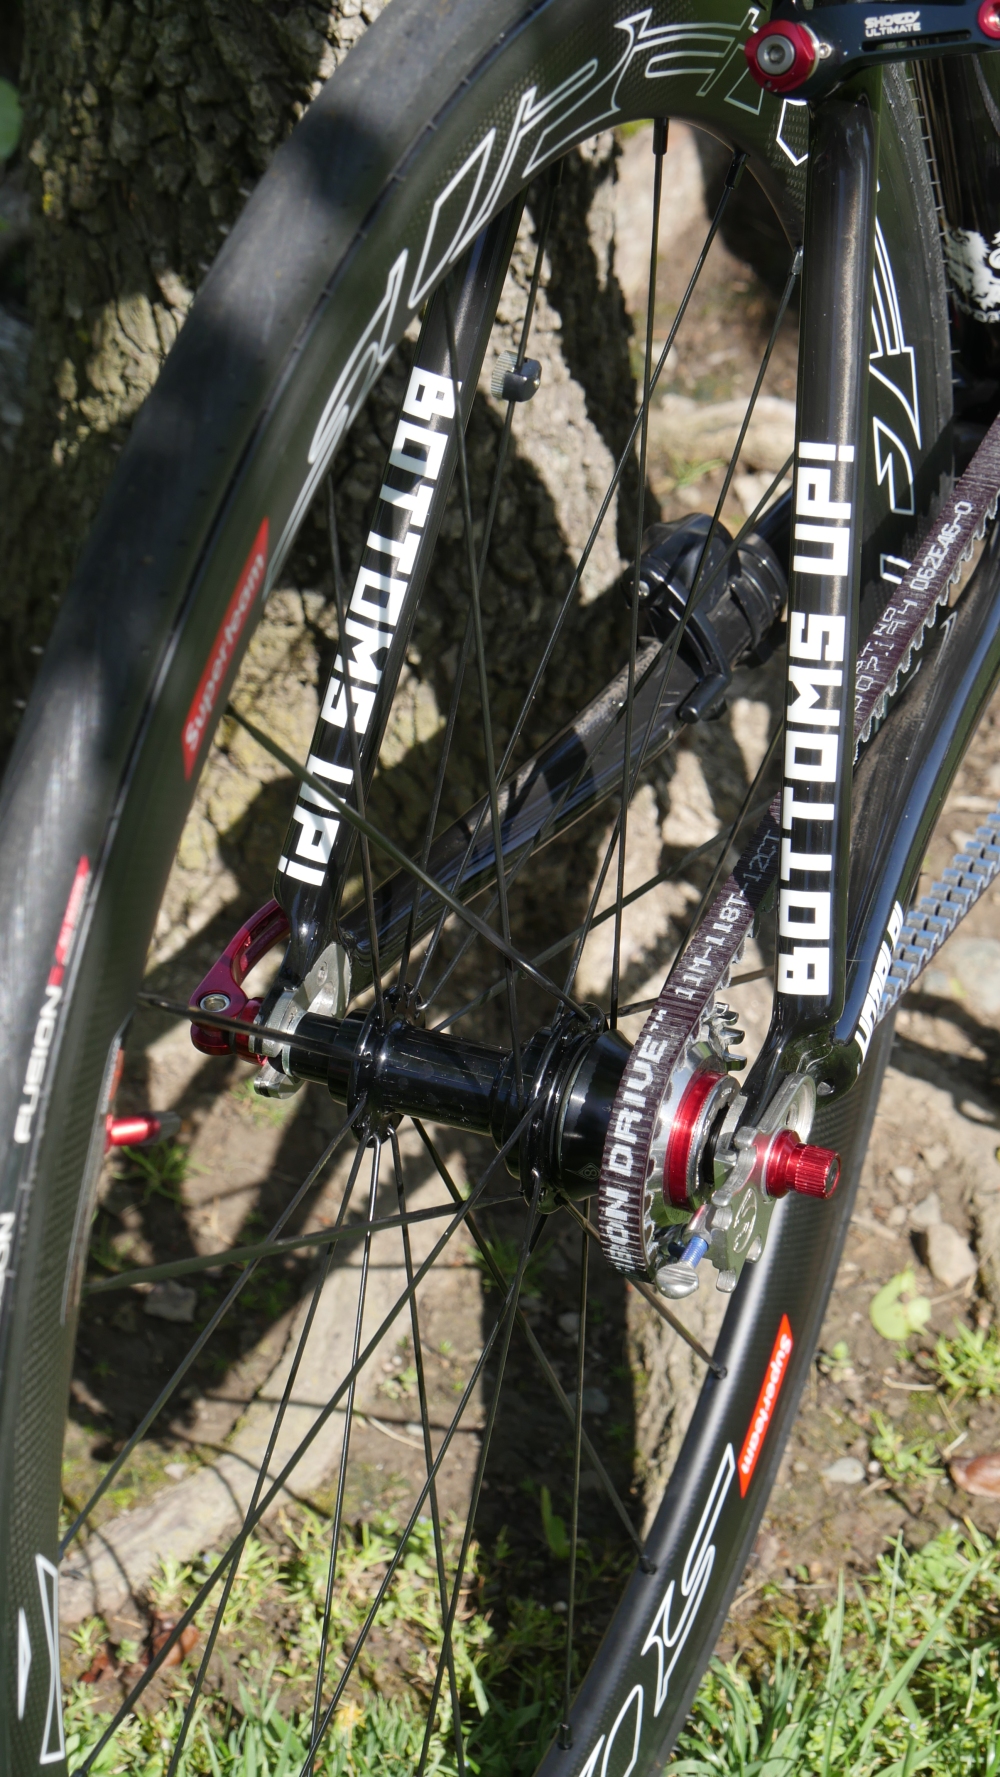
Lastly, this frame has a following of it’s own. Raleigh has decades of tradition and heritage in the cyclocross sport and racing. It even has ties to cyclist’s love of beer drinking. One of Raleigh’s most popular frames featured a High-Life inspired paint design. In Taiwanese, “Hodala” means bottoms up. So naturally, it’s well suited for people who like to drink beer and pick up there bikes and run through obstacles and mud.
Cyclocross has a pretty significant following, especially in Europe. With a bike frame specifically designed around the sport and with an emphasis on beer, it shouldn’t be a big surprise that it was well received by the community and well loved.
Indigenous Wheel Co. has a great write up on the SSCX if you want to learn more about the frame. He’s also got an awesome build of his own detailed in the same post.
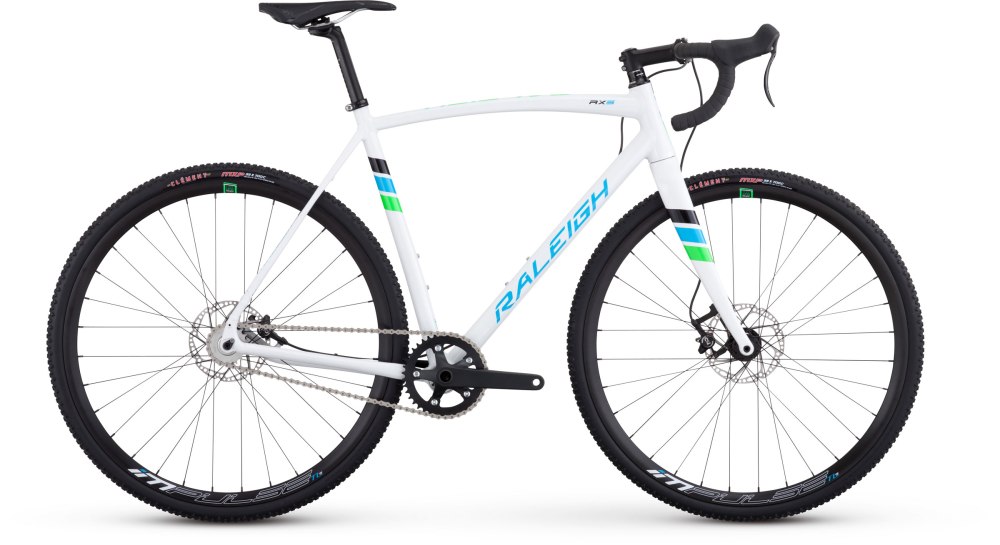
Unfortunately, this frame was a limited edition. Raleigh still makes a belt compatible single speed cross frame but it’s alloy. As a bonus though, the new frame has disc brakes and still holds true to Raleigh’s long tradition in cyclocross bikes. Check out the 2017 RXS bike on Raleigh’s website.
I got wind of Raleigh’s plan to discontinue the Hodala SSCX frame at a race event a few years back and pounced on my frame while I could still get one. I wasn’t ready to build out the bike and the frame certainly set me back a bit but I’m glad I was able to pick one up while they were still available.
Here are the specs for this frame:
Size 57cm MD/LG
Seat Tube Length 550mm
Standover Height 815mm
Top Tube Length 560mm
Head Tube Length 150mm
Head Angle 72
Seat Angle 73
Wheel Base 1020mm
Chain Stay Length 425mm
Fork Offset 45mm
BB Drop 55mm
BB Threaded
Rear wheel Spacing 130mm
Seatpost 31.6mm
Headset 1-1/8”
Drivetrain: Carbon
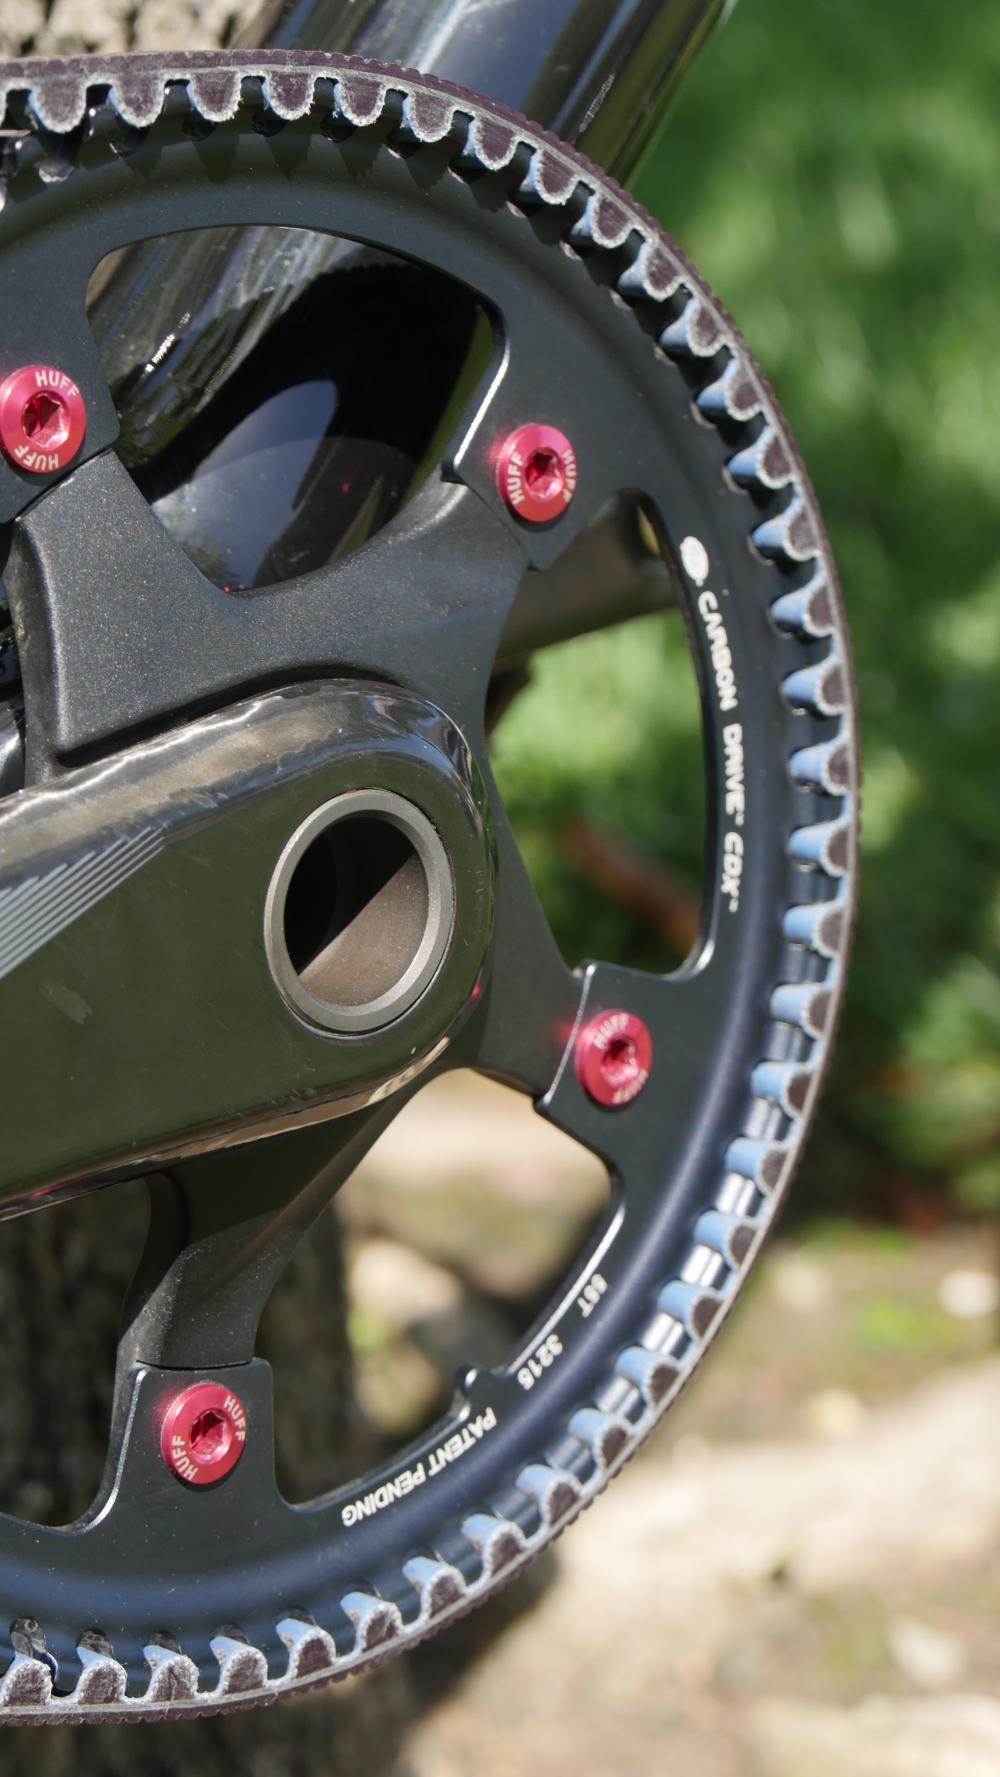
I get asked about it almost every time someone stops to check out this bike. Carbon belt drives bikes are exactly as they sound, bike driven by a virtually indestructible carbon belt that requires no lubrication, doesn’t stretch, and is whisper quiet.
So why a carbon belt drive? Here’s a quick rundown of all the things that sold me:
- Clean – No Lubrication means no greasy build up of dirt, keeping your hands, clothes, and children clean. It also makes cleanup really easy, just hit it with some soap and water. The Carbon Drive Belt has very good chemical resistance so it’s not a big deal if you use something a little more powerful than Dawn to clean up your bike.
- Smooth – The Carbon Drive system eliminates the metal-to-metal contact of chains, delivering an unparalleled smoothness that you need to feel to believe. It’s also nicely punchy with deliberate and immediate power delivery directly from the pedal to the pavement.
- No Noise – The Carbon Drive belt is virtually silent in most riding conditions which is great for sneak attacks. For me, this is a huge part of the zen factor. It allows me to listen and hear the world around me.
- Light Weight – the entire system, 2 sprockets and a belt, weighs less than a typical chain.
- No Stretch – The Carbon Drive belt does not stretch over time like a chain. This means you don’t have to re-tension or replace the belt due to stretch.
- Self-Cleaning – The patented CenterTrack and MudPort profiles were designed specifically to shed mud, dirt, snow and other debris to meet the needs and environmental challenges of a bicycle.
- Life – Testing has shown the Carbon Drive belt to last more than twice the life of chains. For me, that should add up to about 6,000 miles per belt!
- Consistent Efficiency – the Carbon Drive belt provides consistent efficiency over the lifetime of the drive. In contrast, chain efficiency decreases with wear and dirt.
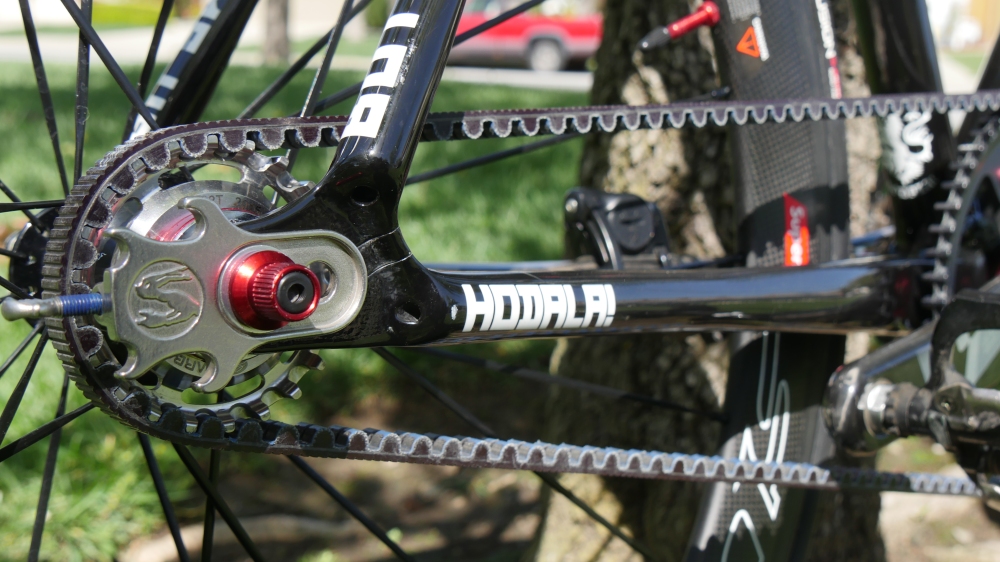
Of course, there are also downsides. Because a belt cannot be broken and then reattached, the Carbon Drive System requires a belt-compatible frame. This means that you can’t drop a belt on just any bike or single speed you find on Craigslist. You’ll have to shop around to find a compatible frame but that can be the fun part too. Let me know if you find any other belt-compatible carbon frames. The Hodala SSCX fram as a small piece that can be removed from the right fork-end. this gives you just enough space to slide the belt in. If you look close at the picture above, you’ll see the removable piec of the frame just between the right seatstay and chainstay.
The other downside is that the belt also needs center and distance adjustment for proper installation. Since the length cannot be adjusted, your front chainring and rear cog, fork-end length, and chain stay length all have to add up right. If this doesn’t happen, you’ll end up with a belt that is too small to fit around the rear cog or too long to be tensioned. – I learned this the hard expensive way.
These are the main components of the drivetrain. It took me a little trial and error to figure out (and source) all of the right components but it eventually came together. I’ll talk a little bit more about the frustrations later but for now, we can see what I selected for this build.
- Gates Carbon Drive CDX CenterTrack Belt 118 tooth – Now available in Red!
- Gates Carbon Drive CDX CenterTrack Rear Sprocket 24 tooth 9-spline
- Gates Carbon Drive CDX CenterTrack Front Chainring 55 tooth 5 bolt 130mm bcd
The gearing here isn’t particularly fast but it makes for a comfortable ride when I’m out and about or racing across town for exercise. Since I wanted to commute with this bike, I picked a gear ratio that was suitable for my route.
As for the rest of the drivetrain, here’s what I used:
- SRAM GXP Blackbox Ceramic Bottom Bracket – not much here, got to have this too. SRAM GXP is a a pretty solid choice in terms or bottom brackets and you can’t go wrong with ceramic bearings.
- SRAM Force CX1 road bike chainring GPX, carbon grey – I really wanted a carbon crank but it’s hard to find a single speed road version. Luckily SRAM makes the CX1 set and it works great. Except for one little detail… it’s not 130mm BCD so it my front chainring didn’t mate.
- SRAM Force Crank Spider 130mm BCD 11 Speed, Matte Black – This little beauty came to the rescue when I realized that my crankset didn’t mate with the front sprocket. Crisis averted.
- Origin8 Hub Single Speed Kit For Freehub, Alloy, Red – This helps with the alignment of the belt. With the CDX belts, alignment it’s a huge problem because the centertrack help keep the belt from walking off the sprockets. But, we don’t want to excessively wear the belt because they are not aligned, so this is still necessary. I find that this one kit works well with multiple wheelsets.
- Surly Tuggnut chain spanner plus bottle opener – I think this does a good job of fitting in with the Hodala theme. This piece sets the tension on the belt. I’ve provided a few links (at the bottom) to some tools that will help get the tension dialed in. You can find the links in the Tools section near the bottom.
Carbon Belt Drive: The Hard Way
As I mentioned earlier, I struggled with this part. My frame has a chainstay length of 425mm, it’s the same for all of the Hodala SSCX fame sizes. I figured out the proper gearing by riding my regular road bike around town. Once I found a comfortable gear, I recorded the number of teeth on front chainring and rear cog and calculated the ratio.
Gates has their own drive calculator which I used to figure out the front and rear sprocket sizes and belt length. Running the calculator, it said I needed a 122T belt for the 55T/24T setup I wanted. After ordering the belt, I realized it was much too big.
Trying this a second time, I tried using the calculator to determine a smaller belt that would work. I ended up with a 113T belt this go-around and now the belt was too small. I decided to shoot the gap and get a third belt, 118T and I finally had a drive train that worked. It was a bit of a disaster and it cost about 3-times what it should have but I finally figured it out. The upside, I guess, is that I now have plenty of belts should I ever change my gearing.
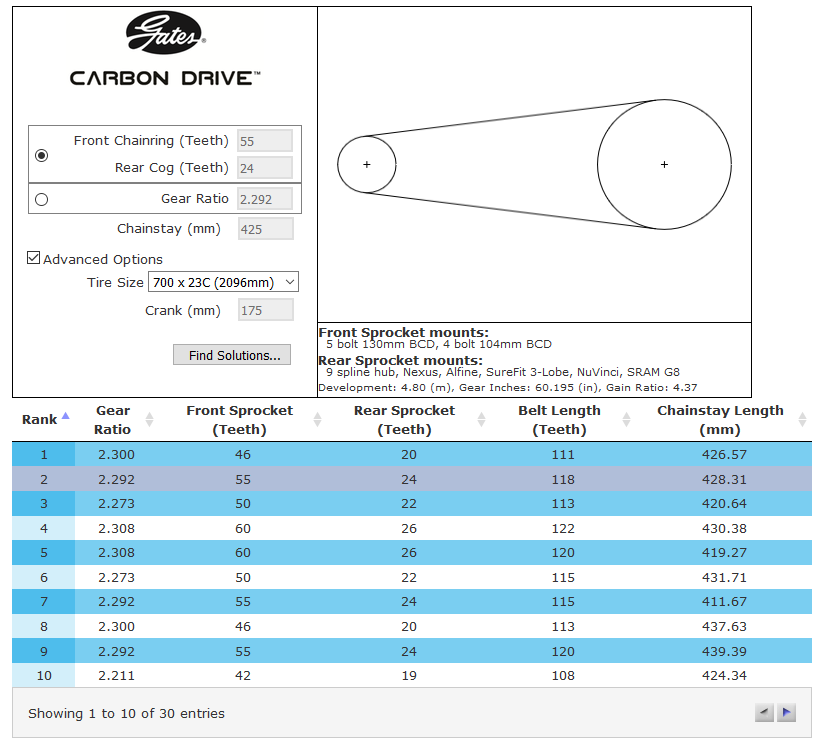
I think Gates must have tweaked their calculator since then because if you enter these values today, you immediately get to the right answer (118T). I know I didn’t screw this up the first time because I made a PDF of the page after initially running the calculator and the two results are clearly different with the same given information. The bottom line is that it does work now and so hopefully few others will have this trouble.
Wheels: Carbon
Here’s where the depth of my wallet (or lack thereof) really shines through. And much as I’d love to run some ultra cool carbon wheels (like an Indigenous Wheel Co. wheelset), I’ve got to keep it practical. My first set of carbon clincher wheels were a great find on Craigslist from a former Ritchey racer. For about $400 cash, I picked up an authentic set of 2009 Ritchey WCS carbon 58mm clinchers. This was Ritchey’s premium wheelset that year. I certainly wasn’t in the market for carbon wheelsets in 2009 but they certainly were not $400 either.
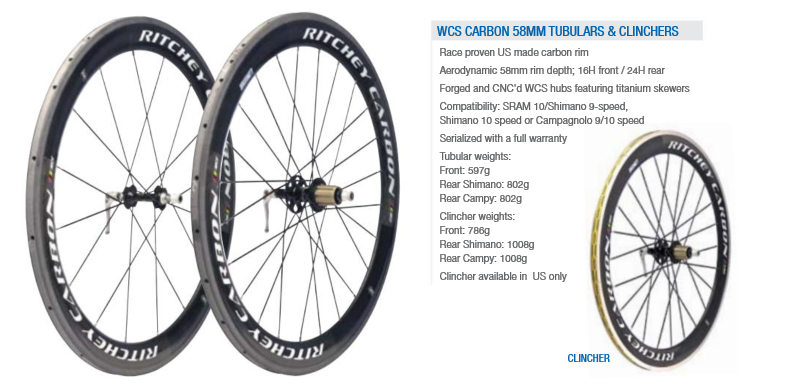
What’s cool about these wheels are they actually have an alloy braking surface. This means I don’t need to run carbon brakes and there’s no need to fret about heating up or warping carbon rims with excessive breaking. The downside here is that there is a small weight penalty for the alloy.
Closer to the end of the build I decided to try my luck with Superteam carbon road wheels. These are newer and almost 300g lighter than the Ritchey wheels. I suppose I’m really trusting my face to these guys but they are affordable carbon wheels that appear to be highly rated. I figure I’ll break them in on the commute for a few thousand miles and if they seem sturdy then maybe I can use them for climbs.

Brakes: Cantilever
If you’ve had carbon wheels before, you already know that carbon braking surfaces require special brake pads. Since I’m using cantilever brakes, this is a pretty easy thing to swap out. For me the real difficulty was getting the brake pads adjusted properly so that they contact the rim in the right space. For this bike, I settled on the following components:
- Avid Shorty Ultimate Rear Cantilever Brake (Black)
- Avid Shorty Ultimate Front Cantilever Brake (Black)
- Avid Barrel Adjuster & Barrell Shorty – I used one of these to replace the stock black barrells that came with the frame.
- Swisstop FlashPro (Shim/SRAM Road) Brake Pads – So far so good.
Another great cantilever brake option is from TRP. I had originally planned on installing TRP EuroX magnesium cantilever brake set but ultimately decided to go with something a little cheaper. The Avid shorty brakes are a bit cheaper and the weight difference was negligible to me. When installing these with my 700c wheels though, I had to leave the pads at the very bottom of the position slot. Even at the bottom, the brake was contacting the rim slightly higher than I wanted, maybe 2-3mm too high. I thought it may be related the the wheel position and belt length but I had the same issue on both the front and rear wheels.
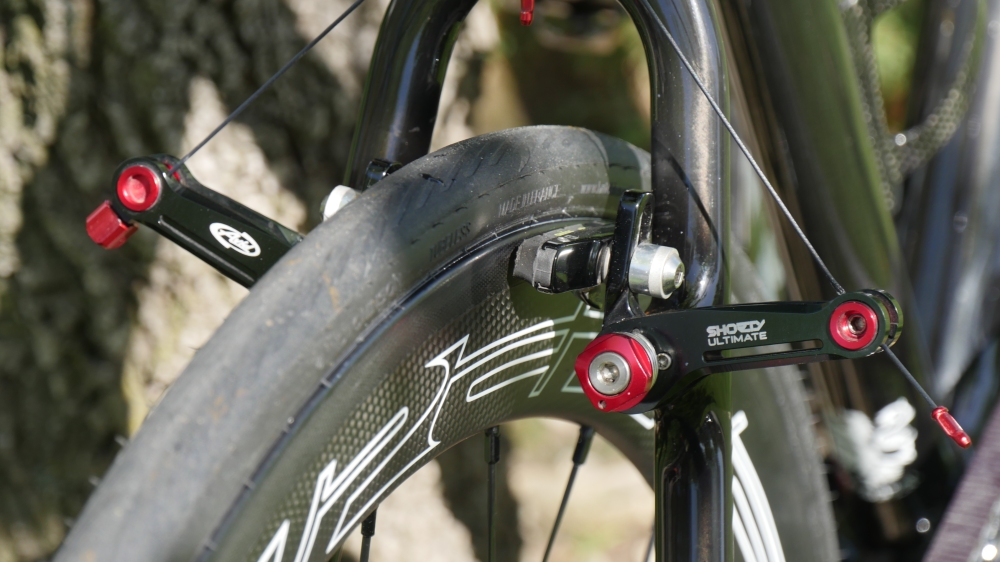
To get better contact with the wheels braking surface, I moved a spacer from the inner space between the cantilever and brake to the outer space between the cap of the brake screw and cantilever.
Tires: Tubeless
Running tubeless tires was another first for me in this build. Honestly, I didn’t know anything about tubeless tires before starting on this bike. I saw a demo video on YouTube as I was looking into tubeless brands and was convinced that I should give this a try. I understand that mountain tires are running lower pressure and some of this is ‘just advertising’ but I was intrigued and wanted to see how well it holds up on road tires.
I HATE changing flats. Whether I’m riding Gran Fondos or just commuting to work, I always run GatorSkin or Armadillo tires. Sometimes, I even add the extra thick tubes, just for the additional millimeter or so of protection. With tubeless, there is a liquid sealant and special tape to make rims and tires airtight. The sealant system is capable of sealing most tires to most rims without inner tubes and it seals punctures automatically. Almost instantly. While you ride.
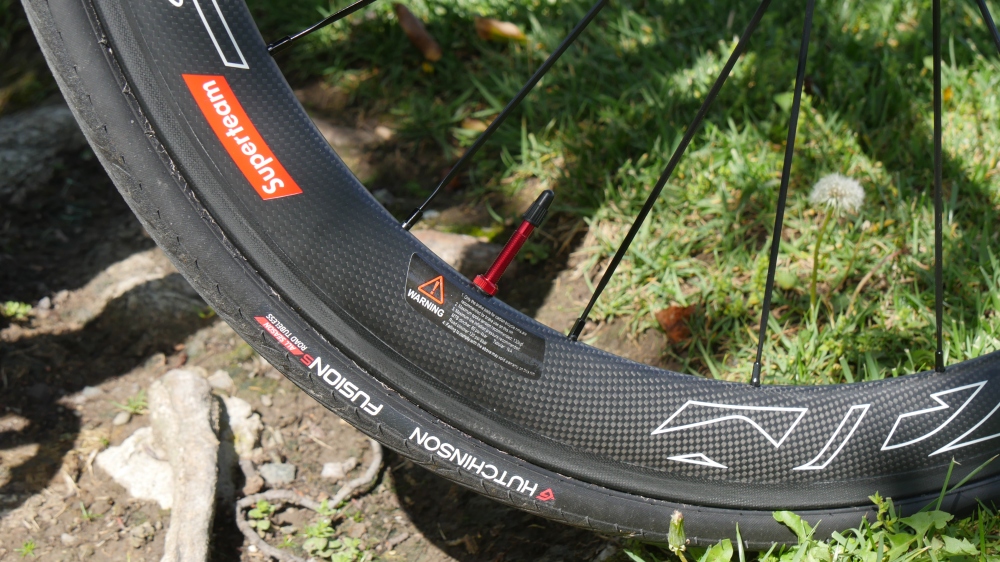
According to Stan Koziatek, almost any wheel can be made to be tubeless, just tape the rim and install a stem. Once the wheel is prepped, add a “Tubeless Ready” tire (like the Hutchinson Fusion 5 All Season tubeless road tire) then, drop (or pump) about 2oz of sealant in the tire and inflate. Now, doing this right requires a little bit more effort than what I’ve described here but it’s actually pretty straight forward when you get the gist of it.
The only trouble I had was keeping pressure in the tires. I found that every time I assembles a wheel, it leaked. Now, it’s normal that you’ll need to top off your tubeless tires a bit more often than tubes but it shouldn’t be a daily occurrence. Once I got the technique down, it actually started working really well.
I actually found this video from MBR to be really helpful with respect to getting tubeless to work well without loosing pressure or spilling sealant all over the place. To get started, I picked up the following items:
- Stans No Tubes Cyclocross Tubesless System – This includes a bunch of sealant, rim tape and some spare tubes.
- Stan’s NoTubes 2-Ounce Sealant Injector – to reduce the mess. I actually used the injector to add sealant directly to the tire rather than through the valve. I don’t like messing with the valve core.
- Stan’s NoTubes Tire Sealant, 16-Ounce – This is included in the kit above but I got some extra because I make messes.
- 80 mm Red, Removable Core – Need this too.
But what if you get a flat? Simple – If you get a flat and you don’t want to mess with sealant and inflation, just remove the tubeless stem and install a spare tube. Inflate and you’re on your way.
Cockpit: What I can afford
I tried to keep it simple and clean. For this bike, I wouldn’t be racing as much as tooling around town or the neighborhood. I rode a buddy’s Merlin titanium bike a few times and fell in love with his bullhorn bar. I picked up a cheap alloy bar and modified it to accommodate interior cable routing. I really like the shape and styling of this bar and the modification was pretty easy to do. At this price, you can afford to muck it up once or twice too… UPANBIKE Bullhorn Riser Bar Rest TT Bar 31.8mm x 42cm
To round out the look, I stuck with carbon textured black bar tape. Here’s a link to Profile Design’s Karbon Bar Wrap (Black).
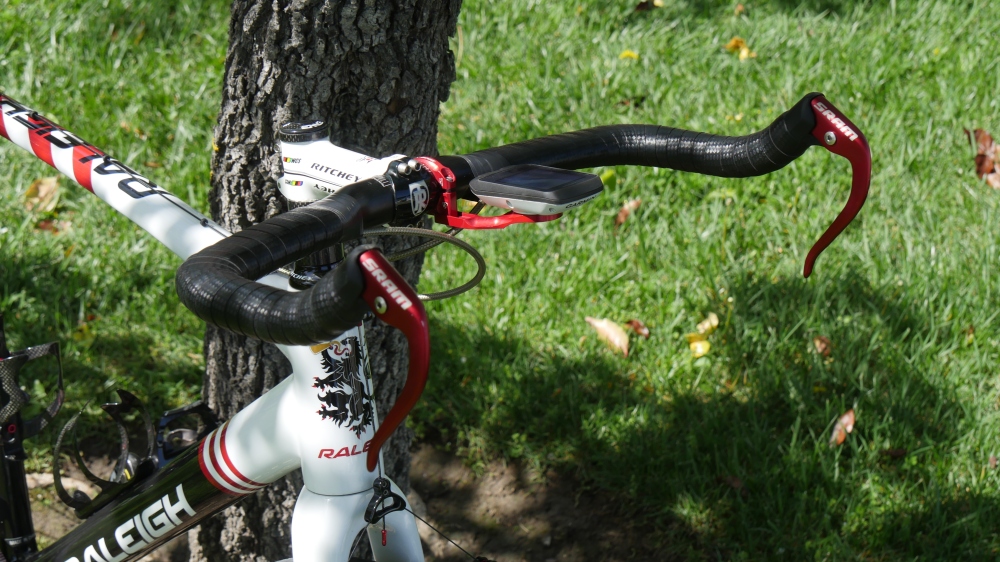
SRAM Aero 500 Brake Lever Set – The red is a perfect match and the minimalist styling really pops on this bike. I hate how they attach though. There is a hex expansion bolt that secures the levers to the bar ends. I really struggled with getting enough torque on this bolt so that it prevented swiveling. To complicate the issue, the brake cable is run through the center of the expansion bolt so if you’ve already installed the cable, you cannot tighten the bolt without first removing the brake cable. It was a total pain the butt to get right. If you have the money, SRAM makes a carbon lever with the same styling. Check out the SRAM Aero S-990.
K-Edge Garmin Handlebar Mount: Red – it’s kind of heavy but I like having the Garmin out in front and the cockpit clean. A cool project for the future would be to draw up my own design and print it. I’d be sacrificing strength but I may be able to drop the weight significantly. Just an idea.
Personal Touches
Origin8 Single-Ring Chainring Bolts – Chainring bolts are pretty straightforward but Origin8 makes beautiful red chainring bolts and I happen to have mad computer skill and access to a laser that I’m quite proficient with. The result was some truly custom bolts and a subtle, personal touch. Here are the stock Origin8 Single-Ring Chainring Bolts.
The UPANBIKE Bullhorn Riser Bar (mentioned in cockpit above) was modified to accommodate internal brake cable routing. This kept the cables pretty well hidden an a consistent look for the bike without spending a ton on a carbon bullhorn.
Aluminum Socket Cap M5 Bolts were added throughout the bike to give it a little extra pop of color. Pro Bolt socket cap M5 bolts are red anodized so they look great and resist weather and rust (aluminum doesn’t rust anyway). I use Pro Bolt’s products on several projects and bikes.
Custom Spanner? For this build, I actually use the Surly Tuggnut chain spanner (see drivechain above) to put the proper tension on the belt but I’ve recently completed building a CNC in my garage and I think this would make for a cool (easy) project to get more familiar with my new machine. Stay tuned for the update and the CNC write-up -both are well worth the wait.
Everything else: Parts is Parts
Here’s a list of the additional components that I picked up to round out the build. I’m sure most readers will realize that they need these items but I like to be explicit about what I use in my builds. So for completeness here are the remaining pieces:
- SRAM Aluminum Ferrule Kit (Red)
- Bicycle Bike Shifter Break Cable Tips Red
- Carbon BIKJRFOTO Headset spacers 1 1/8″ 5-10-15-20mm
- Jagwire Road Pro Complete Road Brake And Derailleur Kit Carbon Silver, One Size – I actually got two of these because I accidentally ruined some cables trying to get the brakes to work. You don’t actually need a road set but I really liked the carbon silver color and the braided look of this set and it was only available as a road kit.
- JRFOTO Carbon Bike Water Bottle Holder Cage – Cheap carbon parts! Some people pay $60 for the name brand stuff. I actually like that they are unmarked. I have 4 of these (two on two bikes) and never had any problems.
- Signswise 31.6*400mm Carbon Seatpost Tube
- Performance Quick Release Axle Skewer Set Alloy (Red)
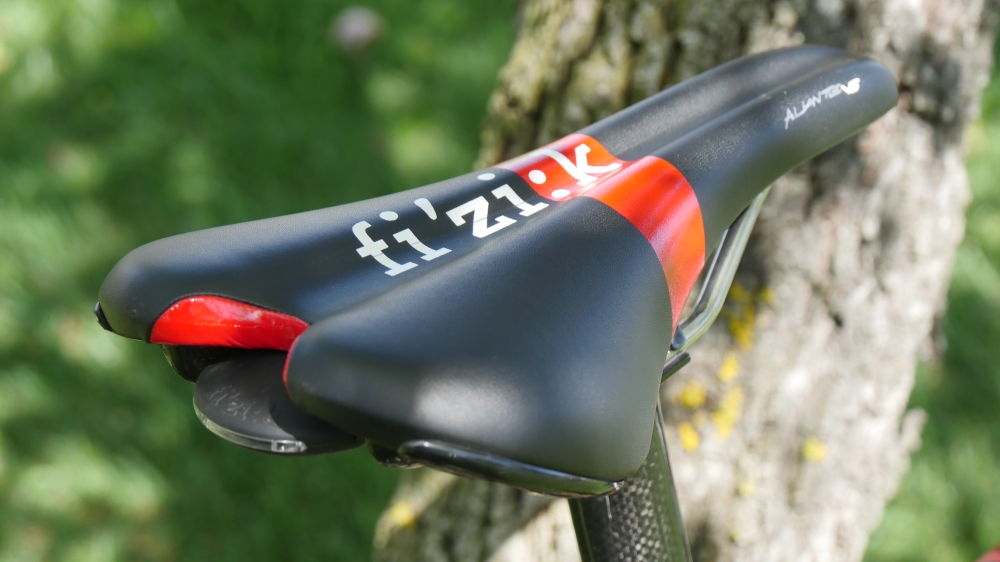
- Fizik Aliante VS Saddle, Black/Red Super comfortable and not too pricey. Fizik used to have a nice product finder on their website to help you find the right saddle for your riding style. (maybe they still do)
- Fizik Blink Bicycle Tail Light (Black) – This is a must have if you have a Fizik saddle. It’s not super bright but it’s well hidden.
Tools:
Gates 91107 Belt Tension Tester – You’ll need one of these to check the tension of the belt. Gates makes a bunch of these for different belts and applications so be careful to get the right one. You’ll want the tension between 28 and 53lbs depending on the type of riding you do and whether or not you have an internal hub.
Gates App – Instead of having a tension tester with you each time you pull your wheel off, you can simply download the app and run it on your smart phone. Hold you phone near the belt and pluck it. The frequency of the belt will be recorded and translated to tension.
Craftsman 2 pc 16” Rubber Strap Wrench Set – This is not only a useful tool for opening stubborn jars but it’s great for holding the rear sprocket while it’s locked in place.
Park Tool PCS-12 Home Mechanic Bench Mount Repair Stand – Everyone should have a repair stand!
TEKTON 25282 26-pc. Long Arm Ball End Hex Key Wrench Set, Inch/Metric – You probably already have these but I always find it nice when people list out everything you need.
Park Tool 12-Speed Compatible Chain Whip/Sprocket Remover – SR-12 – We really only need this for the 1″ hex but its a great tool to have for chain drive bikes too as the whip let’s you grip cassettes quite easily. This is tools function is largely replaced by the strap wrench for this build.
Park Tool FR-5.2 Cassette Lockring Tool – For installing and removing the lockring on the rear hub. You may need a different one depending on the lockring you use.
Park Tool BBT-19 Bottom Bracket Tool – This will help install the bottom bracket and torque it to spec.
Park Tool Professional Cable and Housing Cutter – This cuts cables and housings really well. It also crimps ferrules.
Craftsman Micro-Clicker Torque Wrench 1/2″ Drive – You’ll need one of these for various parts of the bike like the bottom bracket, headtube, rear wheel lock ring, crank set, etc.
Park Tool Home Mechanic Pedal Wrench – Check your pedals, you may need a different tool
Get Some Schwag…

What are your torque specs?
LikeLike
You’ll have to be more specific if you’re looking for a particular torque. The required torque for most components is specified in the manual for that part. On a lot of SRAM and Shimano parts, the part is actually marked with the correct torque.
LikeLike
Hey brother if you want to sell this beauty drop me a line I just got a raise and I need to blow it on this Kurtis
kurtisg8@gmail.com
LikeLike